 Nederlands
 English
Customer setup
Create new customer environment
The “supplier” has the same name as specified in your Ecmanage contract.
You will see the log-in page of your Ecmanage supplier environment. After logging in with your username and password, the various options will be available via the menu. The user you use is referred to as the “supplier admin” and has access to this supplier environment and to all of your customer environments.
General
A supplier admin can create an environment (“portal”) for a customer using the “Add customer” module. To do this, select Maintenance >> Add customer via the main menu.
The add Customer form is divided into three sections. 1. Company details 2. Website details 3. Address details
1. Company details
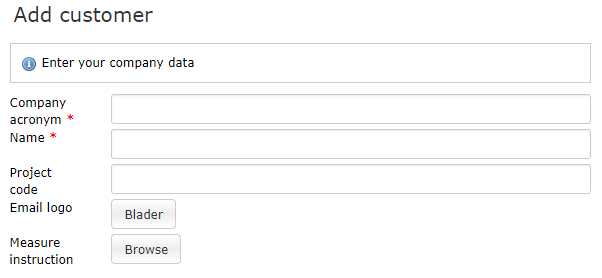
Fields marked with a red asterisk are mandatory.
- <Company acro>
Acronym (“acro”) a unique client identification (i.e.: SHELL or BT). While this field is limited to 50 characters, we recommend limiting the length of the code as this acro will be present in the URL of the client portal internet address.
- <Name>
Company name.
- <Project code>
Optional coding for the client, such as an account number. This can be used to provide your ERP system with a unique reference, for instance a debtor id.
- <Email logo>
The logo is uploaded from a file. Possible logo extensions are “.png”, “.jpg”. This provides a personal touch to all outgoing emails. We recommend limiting the logo to no larger than 600×100px. This can be modified after the customer portal has been setup. Login to the customer portal and go to
Maintenance >> Base data >> Departments.- <Measure instructions>
Optional measure instructions are uploaded from a file. The allowable extension is “.pdf”. This is the document which will be displayed under the ‘i’ during the ordering process. This can be modified after the customer portal has been setup. Login to the customer portal and go to
Maintenance >> Base data >> Departments.
2. Website details
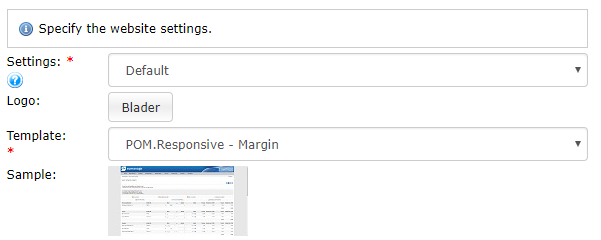
- <Settings>
By selecting an alternate customer environment, a copy of the settings will be used for the creation of the new environment. This refers to the client settings and page security setup.
- <Logo>
The logo is uploaded from a file. Possible logo extensions are “.png”, “.jpg”. The maximum logo height is 90px, the logo is displayed at the top left banner of a cusomter portal. If the logo is larger, it will be scaled to fit.
- <Template>
This is a design template. It is possible to alter the colour choices in order to match the customer logo colours at a later stage by logging into the customer portal and go to System >> Portal settings`.
3. Address details
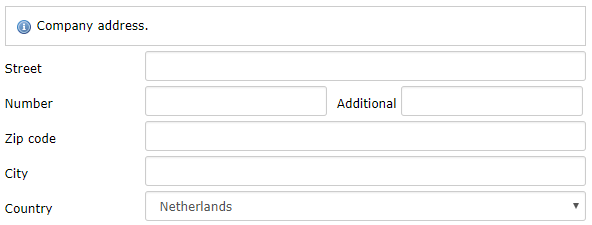
This address may be selected as the preferred delivery address for orders placed for a department. Whether this address should or should not be displayed can be determined via System >> Customer settings.
The address can be modified after the portal has been setup in the customer environment via Maintenance >> Base data >> Departments.
Confirmation
You can now create the client. This may take some time. While the system is processing the request, you will see an overview and status of the steps taken:
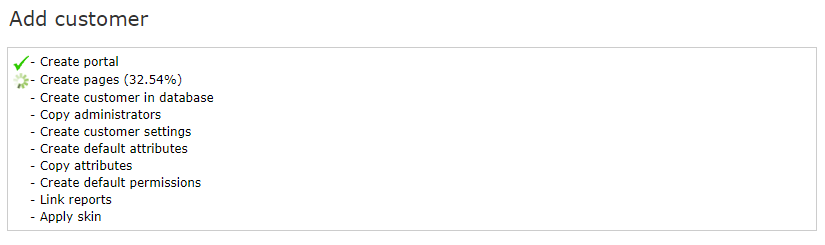
After completion of all steps, you will receive a summary screen and the information for the client’s new admin account will be displayed:
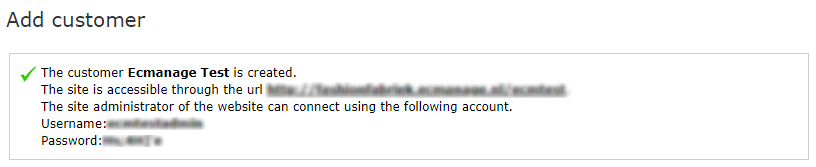
This user may only access this portal and is referred to as the “customer admin”.