 Nederlands
 English
Manage sets
In Ecmanage it is determined what someone can order through as sets. These sets are ‘collection bins of products’ containing all products that can be ordered. These sets are then linked to people.
Within the set, these selection of products have an start date. This determines from when this set with these products can be ordered. By adding more of these entry dates and linking products to it, it is possible to make the orderable products vary over time. For example the standard products that start on January 1th 2016 and from December 1th 2016 there will also be Christmas items. The selection of January 1th then expires on December 1th, and that of December 1th then becomes active.
By also starting a selection on January 1th 2017, it is possible to make these Christmas items ‘disappear’ again from that date.
As soon as a person orders, the ordering screen looks at the data of that person and retrieves all sets that are linked to that person. These products are listed and grouped and sorted depending on how they are set (see the manual Manage assortment).
The system has 4 types of sets:
Normal set
Start set
Personal set
Bulk set
In addition, “supplier” is the same as the name that was supplied with the purchase of Ecmanage. And “customer” is the same as the company acronym as entered when creating the customer environment.
You will then be taken to the login screen of the customer environment. Log in here with a user who has the authority to manage sets. By default these are the customer admin and supplier admin roles.
Normal sets
Normal sets are sets that are required for normal ordering for/by a user.
Manage
Go to Maintenance >> Product assortment >> Sets via the main menu to manage sets:
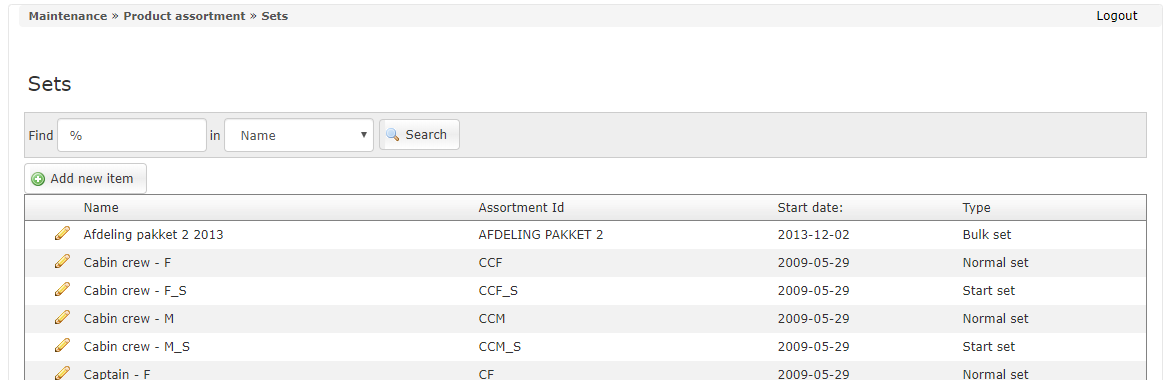
The packages can be created and changed using this screen.
Click on “Add item” to create a new set.
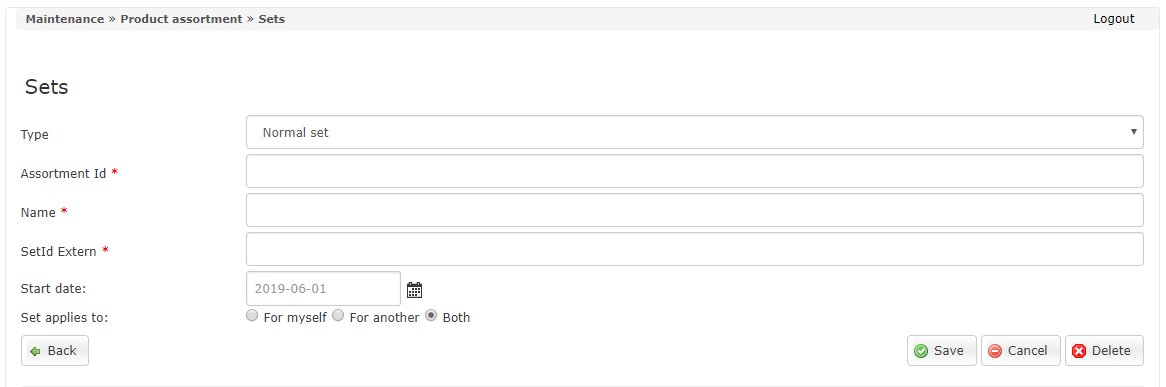
- <Code>
A unique code for this set.
- <Type>
This determines which type of set you create. In this case this is Normal set”.
- <Name>
The name of the set.
- <SetId Extern>
This is a unique code for this set in combination with the starting date. For instance “CCM_2016”.
- <Start date>
This is the date on which the selection of products (that can be selected after saving) must start. The products can only be ordered from that date.
- <Set applies to>
This determines whether this set is only used when ordering for myself, ordering for another person, or both. This is useful when there are items that a person is not allowed to order themselves, but a superior is for him. By linking an (extra) set that only applies to “For another”, a person does not see it when he ordered himself, but someone else who orders for him does.
Then press on the button “Save” to create the set.
After the set has been saved, the products become visible in the system
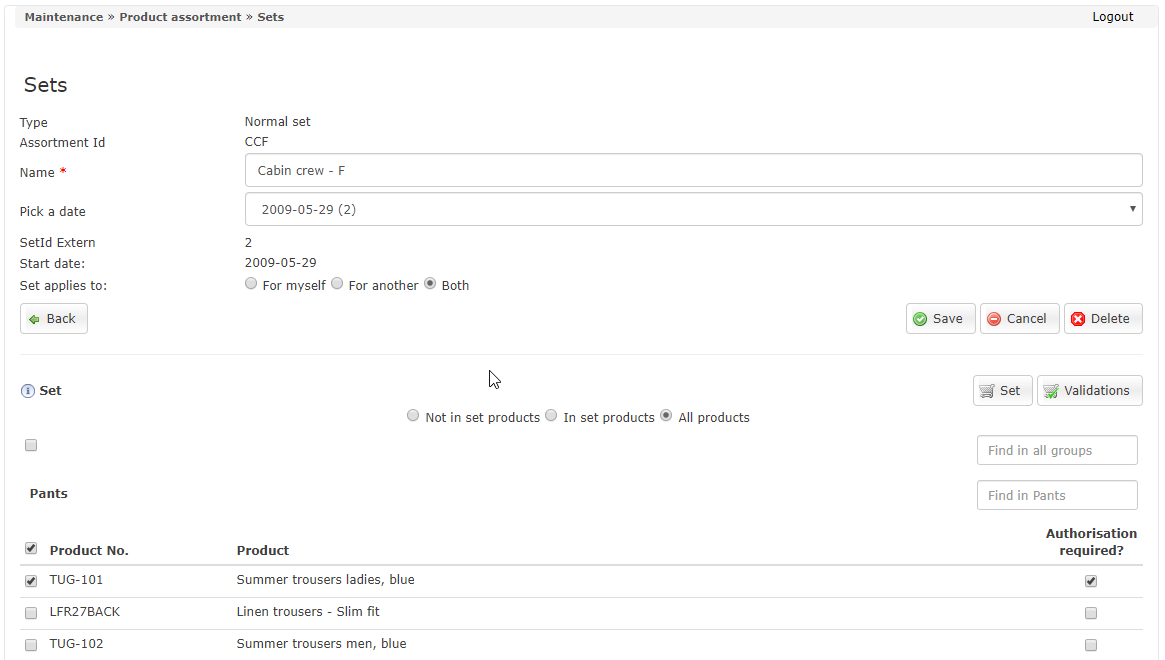
Products can now be added to the set by checking it.
By checking “Autorisation required?” It is set that every order that contains this product from this set must be manually approved (regardless of customer settings).
The products are shown per product group. It is possible to search these products by using the search fields.
“Search in all groups” hides all products whose search terms do not appear in the article number or name. The “Search” fields for each group only hide products within the corresponding group.
Assign sets
Go through the main menu to Maintenance >> Product assortment >> Assign Sets and choose “Set for persons” at the top to link sets:
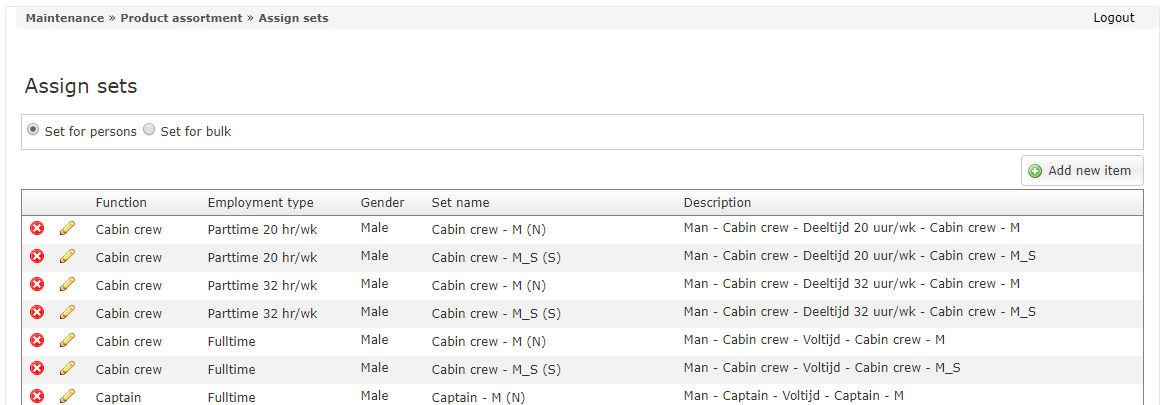
Normal sets are linked to users via the combination function, employment type and gender. Every user with that combination has linked this set to him and can order products from this set.
It is possible to link multiple sets to the same combination. The users can then order all products from all linked sets.
Press the red cross next to a link to remove it, or the pencil to change it. Press “Add dependency” to add a new link:
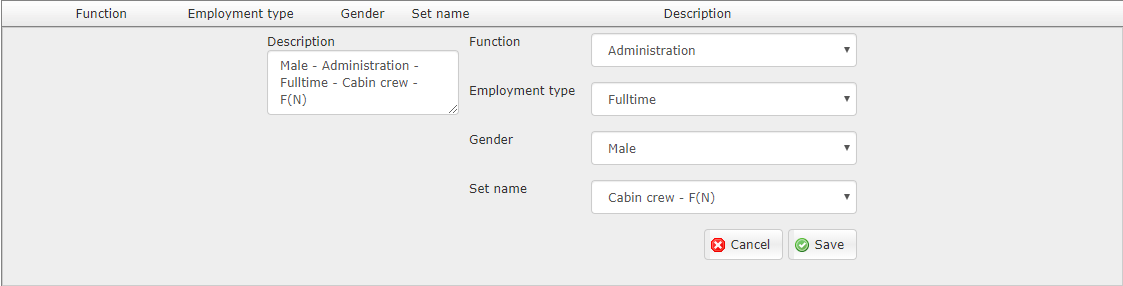
- <Function>
The function to which a set must be linked.
- <Employment type>
The employment type to which a set must be linked.
- <Gender>
The gender to which a set must be linked.
- <Set name>
This is the set that must be linked to the above combination of function, employment type and gender.
- <Description>
This is the description of the link. This is the text that a user sees in his overview of linked sets. This description is automatically generated based on the selected values, but can be adjusted manually.
Then press “Save” to save the link.
Start set
The start set is a collection of products that must be ordered before a user can start ordering.
You can indicate to a user whether he has already ordered a start set and from when it should be ordered: Bij een gebruiker kan worden aangegeven of hij al een startpakket besteld heeft, en vanaf wanneer deze besteld moet worden:
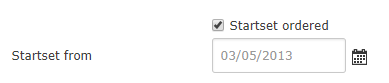
If “Start set is ordered” is unchecked, and the start date is in the past, the user will see the products from the starter set the next time they order.
These products are determined via the “starter set” type. When managing you can not only check the products, but also fill in a number of extra fields:
- <Amount>
The number that must be entered as standard in the order for the starter set. A product is only part of the starter set if this number is 1 or more.
- <Editable>
Indicates whether the orderer can change the number when placing the order.
- <Min quantity>
The minimum order quantity for this product. Only applies if Mutable is checked.
- <Max quantity>
The maximum number that can be ordered from this product. Only applies if Mutable is checked.
- <Authorisation required>
By checking “Autorisation required?” It is set that every order that contains this product from this set must be manually approved (regardless of customer settings).
Once a start set order has been placed, “Startset ordered” will be checked under user management. As a result, the user will see the products from the normal set the next time they order.
Personal set
It is possible to link specific (sizes of specific) products to specific people. This makes it possible to link customized products to users in addition to the products from the normal set.
Just like all other products, the order screen also collects custom products via a set. The difference with a normal set is that these are not linked via a combination of function, employment and gender, but directly to the user.
In principle, only 1 set of the “Personal” type is required per customer environment. Once a product in this set is checked, it can be linked to a user. For more information about custom products, see the manual Custom products.
Bulk set
The standard functionality with regard to bulk orders (orders for a department) is that all products that are present in the customer environment can be ordered here.
It is sometimes desirable that some products cannot be chosen for a bulk order, or that a department has a specific selection of available products. In that case, a bulk set can be created for that selection.
Manage
Managing bulk sets is identical to managing normal sets, but then the type is “Bulk sets”.
Assign sets
Go through the main menu to Maintenance >> Product assortment >> Assign sets and choose the set for Bulk at the top to link sets:
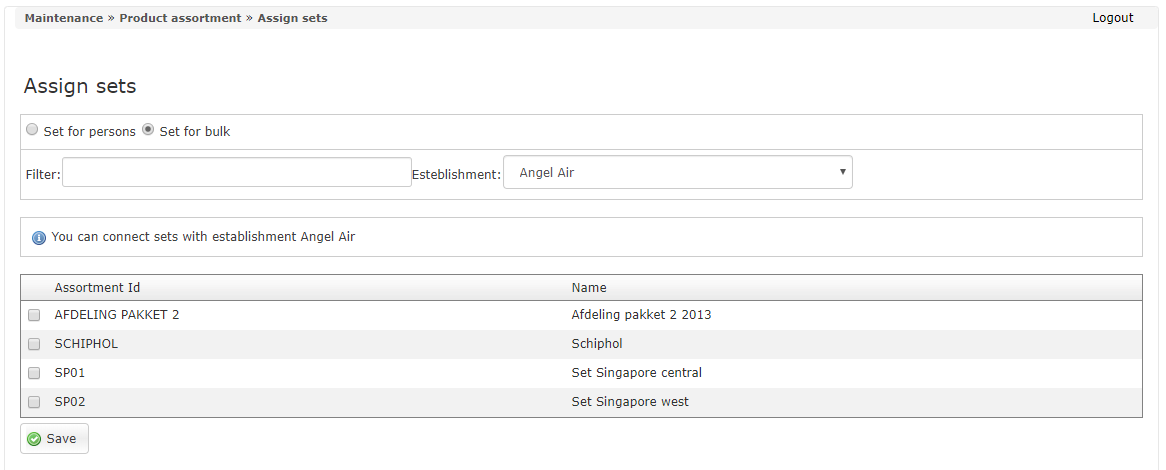
Bulk sets are directly linked to departments. Choose a department at the top and check the set at the bottom.
It is possible to link multiple sets to the same department by simply checking multiple sets.
Then press “Save” to save.
The bulk order screen retrieves the sets for the selected department when ordering. If it does not have any sets, the sets are collected from the parent department. This is repeated until at least 1 set is found, or there are no longer any departments above. In the latter case, all products that are present in the customer environment are displayed.
Set validations
It is possible to indicate within a set that a certain product, or a selection of products, must meet a certain condition. There are currently 2 possible types of conditions:
Max: The product (or a selection of products) may be ordered a maximum number of times within a certain period. For example, shoes that you can only order once a year.
Min: The product (or a selection of products) must, if ordered at all, be ordered with a minimum number.
These rules are called “Set validations”. To make use of this, the use of it must first be switched on.
Go for this via the main menu to System >> Validation settings:
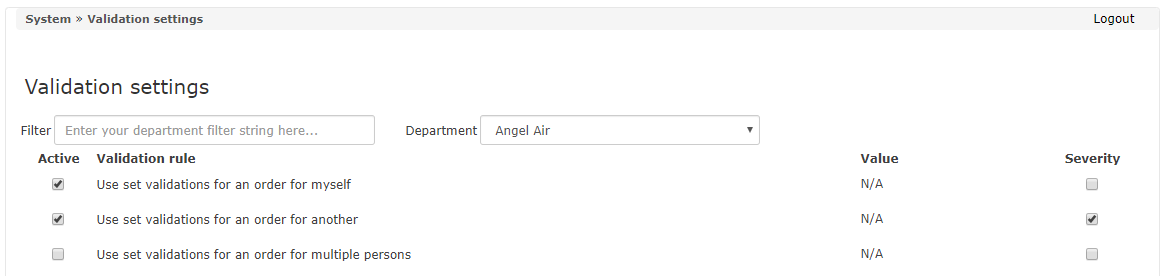
Check here if the set validations should be active for orders for myself, another person and / or several people. Set validations are not available for bulk orders.
The “Severity” field can be used to determine whether the rule is merely a warning or whether it completely prevents the order from being placed.
In addition, the rules must also be specified. To do this, click on “Validations” when changing a set. You will then see an overview of the validation rules present:

Click on “Add rule” to add a rule:
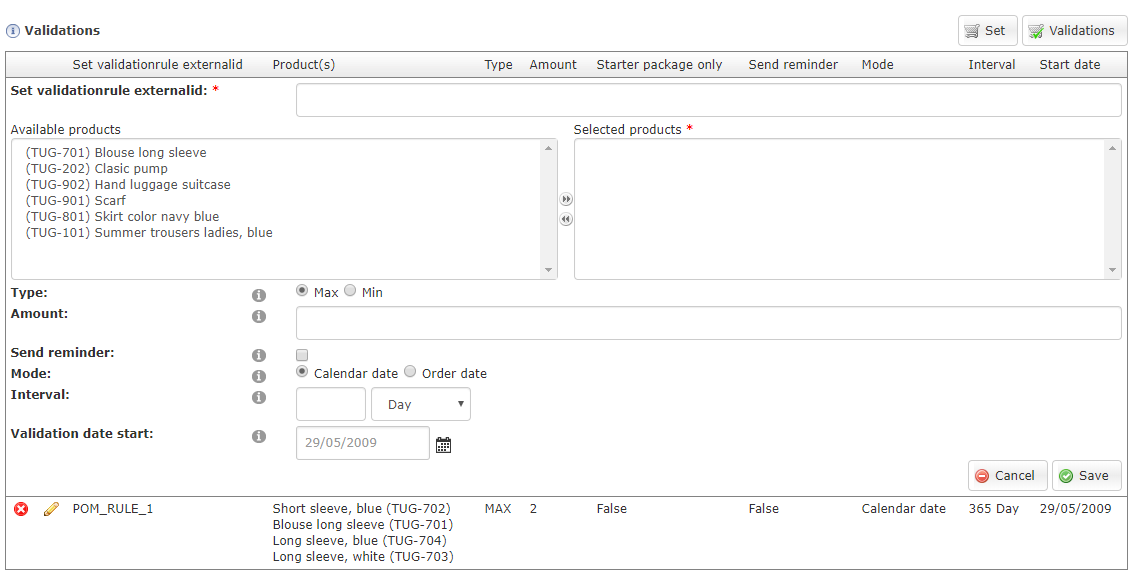
- <Set validationrule Externalid>
A unique code must be added here for each validation rule.
- <Available products>
This is a list of all products that can be used for this rule.
- <Selected products>
This is a list of the products used for this rule. This is filled by selecting 1 or more products under available products and then clicking the arrow to the right (
 ). By selecting selected products and then clicking on the arrow to the left (
 ) you can remove them again.
- <Type>
Determines which condition is used: Min or Max. Min sets the condition that, if a product is ordered, it must be ordered at least with a certain number. Max stipulates that a maximum number of a product may be ordered in a specific period.
- <Amount>
The number used for the condition. With mode “Min” this is the minimum number that must be ordered, with type “Max” this is the maximum number of products used that can be ordered in a certain period.
- <Send reminder>
After someone has reached the maximum number of this validation, and enough time has passed so that there is room within this validation to order more, should this person then receive an e-mail with this message? Only applicable for type Max.
- <Mode>
Specifies how the period should be determined: As a period between 2 orders (“Order date”), or from a fixed calendar date. Only applicable for type Max.
- <Interval>
What is the period in which this rule checks? Only applicable for type Max.
- <Validation start date>
From which date does this rule start? All orders placed before this date are not included. In the Calendar Date mode, this is also the date the interval starts. Only applicable for type Max.
Example: 2 different products have been selected, the skirt and summer trousers, with type Max, a number of 2, an interval of 1 Year and the mode Order date on effective date 2016-01-01:
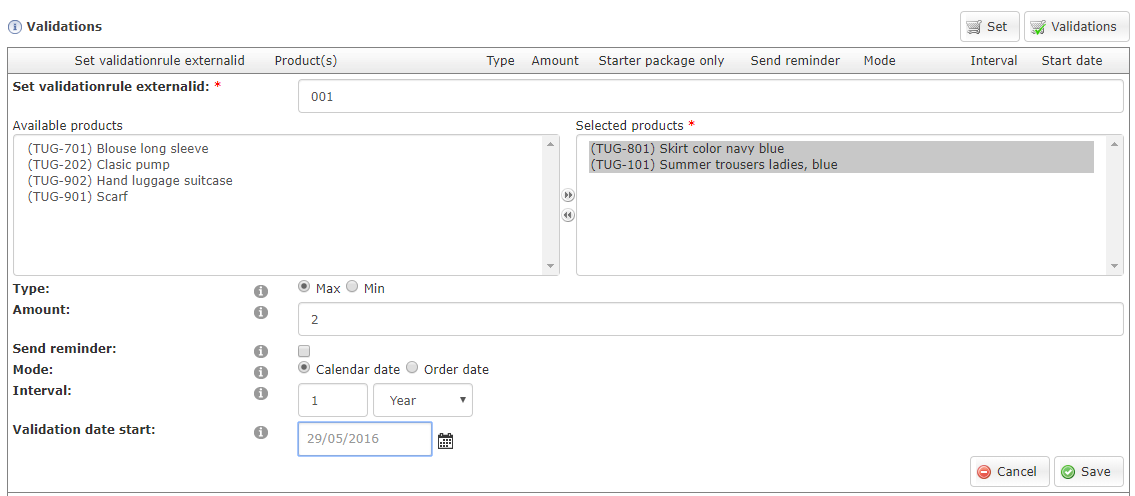
The user may only order 2 of the products (in any combination, so 2 the same, or 2 different ones) in the past year. The order only ‘expires’ after 1 year and is no longer included. Then you can order again. If 2 pants are ordered on December 31th 2016, these products can only be ordered again on December 31th 2017.
If the “Calendar date” mode is selected, everything will expire every 1 year after the starting date, in this example January 1th 2016. So with the above example the products could be ordered again on January 1th 2017.
For more information about validation rules, see the manual Validation settings.