 Nederlands
 English
Configure portal
Configure portal
After creating a new customer environment, the next step is configuration. No master data has been configured at this point and the customer environment is not yet fully functional.
- It is important to understand the various levels for users within the application at this stage. We call these the standard roles. Each role has a different menu structure with different functionality. The following levels are standard:
Consignee (order for yourself within budget)
Group leader (place order for another and approval)
Purchaser (bulk orders or department orders)
Customer admin (manage customer environment)
Supplier admin (manage supplier environment and create customers)
Warning
These default roles are ordered hierarchically within the system. For example: a Consignee cannot order for a Group leader within the system as the Group leader has a higher-ranking role.
A customer portal can be configured by using the various maintenance pages found in the menu structure or by importing xml files to provide the necessary master data. For further information, see the Import manual.
In this document, we will explain how to setup an environment using the options provided in the portal. The sequence of the following paragraphs is important and must be followed.
To begin, you must be logged into the customer environment as a supplier admin. Please browse to the customer environment which has previously been created using the guide Create Customer:
https://supplier.ecmanage.co.uk/customer
Once again, “supplier” is the name as was provided by Ecmanage. “Customer” is the company acro as entered when creating the customer environment.
1. Create departments
Departments can be created via this page. Users or Consignees are linked to departments.
When you start with a new customer a root department is always created and is the highest department in the hierarchy. Adding new departments is optional.
There are many reasons and uses for creating departments. They can be used to separate user groups or they can correspond to locations and therefore be used as a return addresses.
Go to Maintenance >> Base data >> Departments via the main menu.
Information for the selected department can be edited by selecting a department from the tree on the left-hand side of the page.
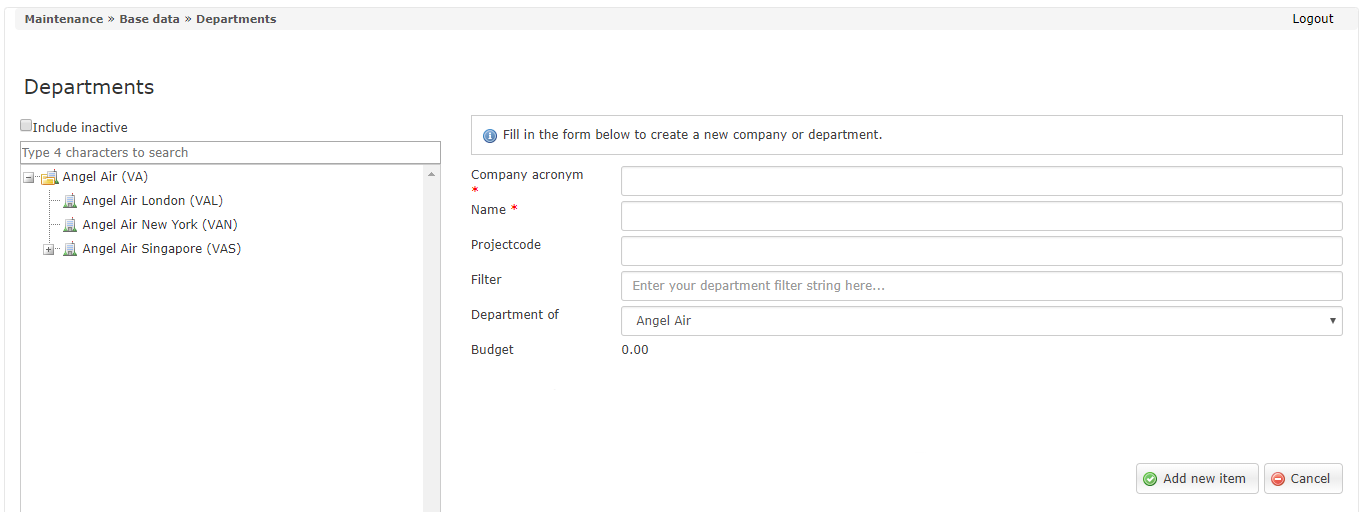
- <Company acro>
Just as the customer itself, departments also require a unique acronym. This is used, for example, to link users to the department.
- <Name>
Department name.
- <Projectcode>
Optional department coding such as an account number. It is possible that the departments require a unique reference, separate from that of the customer environment. This distinction can be achieved by entering a reference code here. In some cases this field can be used to identify debtor id that are needed for order reference.
- <Department of>
A hierarchal structure can be created by selecting a parent department here.
- <Company address>
The department address to be added here may be selected as preferred delivery address once a user linked to this department places an order.
2. Employment types
Ecmanage uses employment types to determine which products can be ordered for a consignee. These products are grouped into packages or sets later on in the setup process. Sets of products use a combination of the following variables: employment type, function and gender.
As an example you can define a Full-time and Part-time employment type. You may use this status to influence which packages and budgets are available to a certain user or consignee.
Go to Maintenance >> Base data >> Employment types via the main menu.
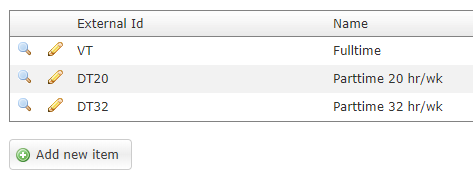
Please create a minimum of one employment type, such as “Full-time”.
Create employment type:

- <Language>
The language in which the name must be entered. When creating a new employment type, begin by selecting a language. By editing the employment type, you may add/edit additional languages. If a user changes the language of the user interface, the name will be displayed in the selected language. If no name has been added for the language, the system will revert to a language for which a name has been provided.
- <Name>
Employment type name. This will be displayed in the user’s profile, for example.
- <External ID>
A unique code for the employment type.
- <Sort Order>
Optional, if provided this determines the order of display.
3. Functions
Functions can be created and edited via this page. You may use this to influence which packages and budgets are available to a certain user or consignee.
Go to Maintenance >> Base data >> Functions via the main menu:

Create a function:

- <Language>
The language in which the name must be completed. When creating a new function, begin by selecting 1 language. By editing the function, you may add/edit additional languages. If a user adjusts the language, the name will be displayed in the selected language. If no name has been added for the language, the system will revert to a language for which a name has been designated.
- <Name>
Function name. This will be displayed in the user’s profile, for example.
- <External ID>
A unique code for the function.
- <Sort Order>
Optional, if provided this determines the order of display.
4. User accounts
Users or consignee’s can be added or edited via this page.
Go to Maintenance >> User accounts via the main menu.
You can begin by searching for existing users or consignee’s:

For more information, view the User management manual.
5. Product groups
Product groups can be created and edited via this page. Product groups are used to clearly classify the products on the order page. Create product groups which are relevant to a user or consignee.
Go to Maintenance >> Product assortment >> Productgroups:
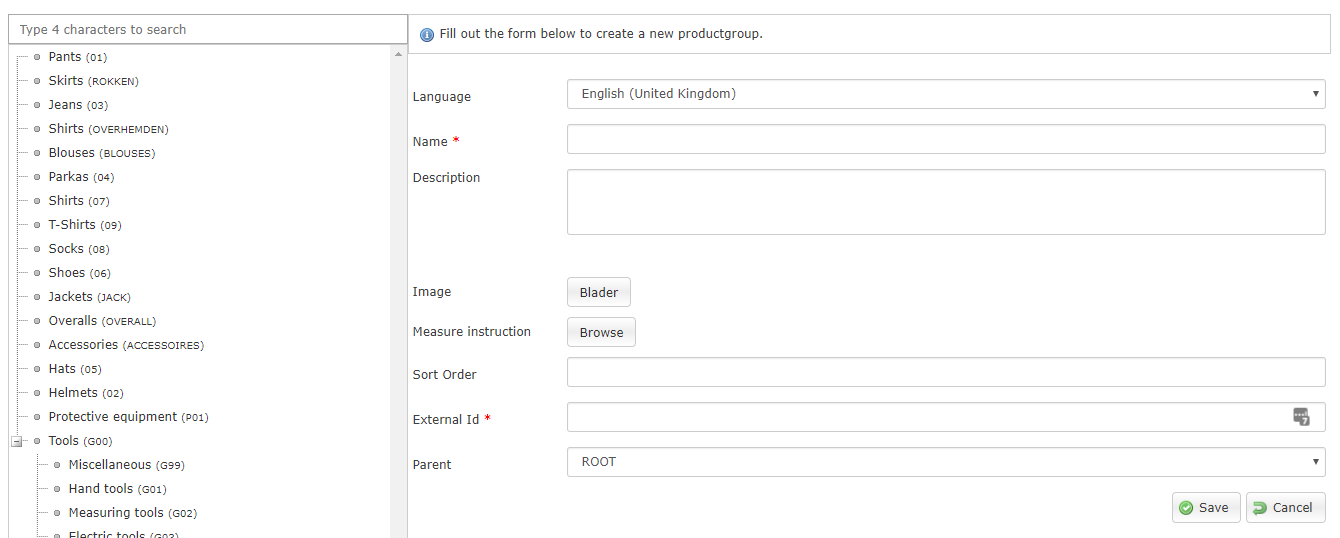
- <Name>
Name of the product group for a selected language. This will be displayed on the order screen.
- <Description>
Any additional information concerning the product group.
- <Image>
An optional image. If the optional product browsing module is enabled, it is possible to display product groups with an image.
- <Measure instruction>
Measure instructions are imported from a file. The accepted extension is “.pdf”. This is the document which is displayed under the ‘i’ during ordering from product groups. This may be provided or modified at a later time.
- <Sort order>
Product groups are automatically listed in alphabetical order on the order screen. An index may be entered here to influence the sorting order.
- <External ID>
A unique code for the product group. This is used to link products to the product group. This code may not contain any symbols, such as an ampersand (&) for example.
- <Parent product group>
Optional. By selecting a preceding product group here, a hierarchial structure can be created. This is only informative and is not displayed elsewhere in the system.
Information for the selected product group can be edited by selecting a product group from the tree on the left-hand side of the screen.
6. Products
Products can be created and edited via this page. Products include an item’s basic information. The actual sizes and pricing is added in a later stage (see next paragraph). All products available for order must be added here.
Go to Maintenance >> Product assortment >> Products via the main menu:

Existing products can be viewed or edited via the ‘magnifying glass’.
Select “New product” to add a new product.
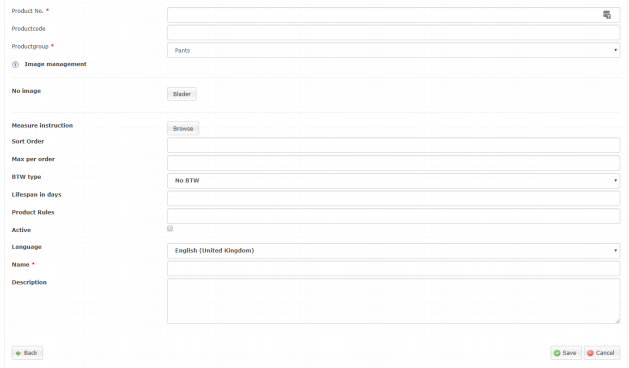
- <Product No.>
Unique number for this item. The field is alphanumeric. This is displayed in the order screen.
- <Product code>
Optional field. Can be used for example as an external reference.
- <Product group>
The product group for this item.
- <Image management>
Additional product information may be provided for the ordering process. An image is also displayed with this information. This image has a maximum width of 265px. If the image is wider, it will be scaled to fit.
- <Measure instruction>
Optional document to be displayed in the (i) product information.
- <Sorting order>
Products are automatically displayed in alphabetical order on the order page. An index can be entered here to influence the sorting order.
- <Maximum per order>
Enter a maximum number of units which can be ordered for a product here. This is a maximum per order. It is possible, therefore, to order this number multiple times.
- <Lifespan in days>
If the additional signaling module is used, the number of days after ordering may be indicated here. The user can receive an alert that the product requires replacement or inspection.
- <Product rules>
An Optional setup. When products have the option to be tailored you can provide details on the possible modifications here. We call the options to be provided “parameters”. Each parameter has a code, the rules is a semicolon seperated list of parameter codes.
- <Active>
Is a product enabled for ordering.
- <Name>
The product name in the selected language. This will be displayed in the order screen.
- <Description>
Any additional product information in the selected language. These details can be viewed during the ordering process.
The item number must be unique for this product. There are ERP systems which have a unique item number per product size combination and not an item number for the product itself. In this case, the unique item numbers must be entered with the size and a generic item number can be created here for this product.
When viewing/editing an existing product, “This product has x active sizes” will be indicated at the top of the page. Select this to navigate to this product’s size and pricing setup page.
7. Product inventory and price
Sizes can be added per product using this form. These sizes also include information such as the price and an indication of default inventory levels.
Go to Maintenance >> Product assortment >> Product inventory and price via the main menu and search for the requested product:
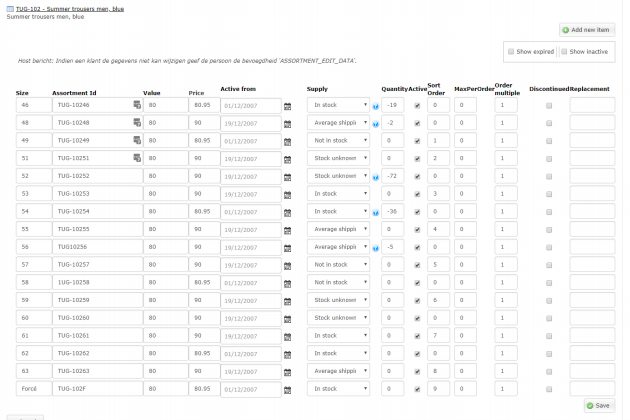
Via the “Add new item” button, additional sizes may be added; any changes to existing sizes can be saved using the “Save” button.
To return to a product’s management screen, select the Product number at the top left of the form.
The assortment ID is a unique item number for each of a product’s sizes. Some ERP systems have a unique item number per product size; in this case, the item number must be entered here. For systems without an item number per size, a generic number must be provided. We advise using the product’s own item number with the size added at the end. A product with item number “TUG-102” in size 46, for example, would receive the assortment ID “TUG-10246”.
For more information, see the Assortment management manual.
8. Product Sets
Sets can be added and managed via this form. This is often used to group clothing, workwear, personal protective equipemnt (ppe) or tools. A set is used to compose a list of products which a user may order depending on his employment type, function and gender.
Go to Maintenance >> Product assortment >> Sets:
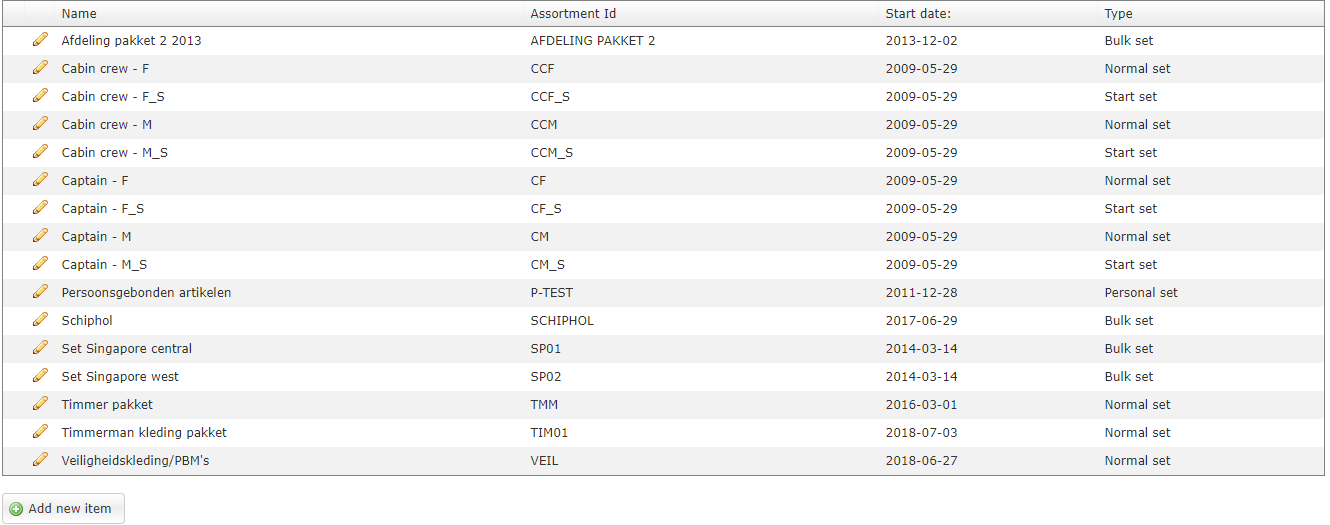
After opening or creating a set, products can be selected to be included in the set.
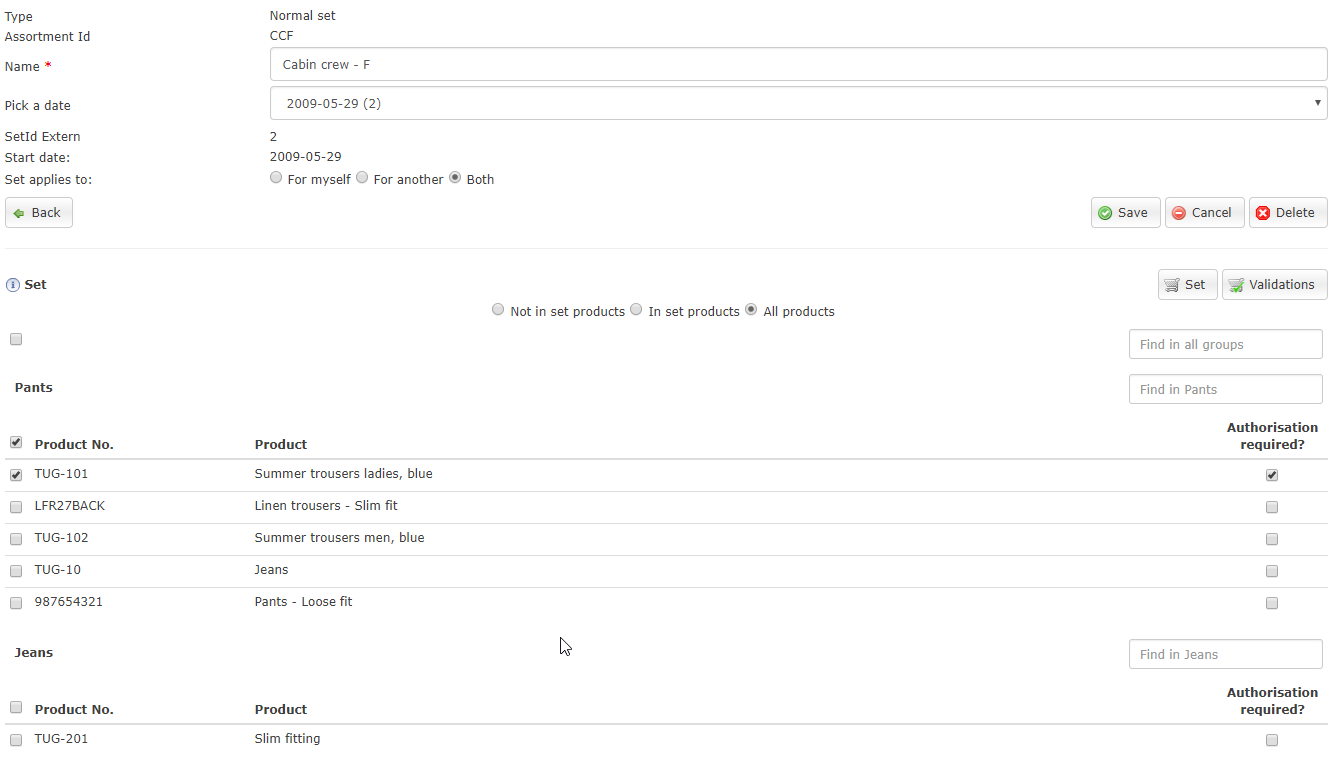
For more information, see the Set management manual.
9. Assign sets
Via this page, sets for users can be linked to combinations of employment type, function and gender. We call this a “Normal Set”. There is also an option to group products in a set which can later be used using a bulk ordering page, we call this a department set. Just as the name suggests a department set can also be linked to a department.
Go to Maintenance >> Product collection >> Assign sets:
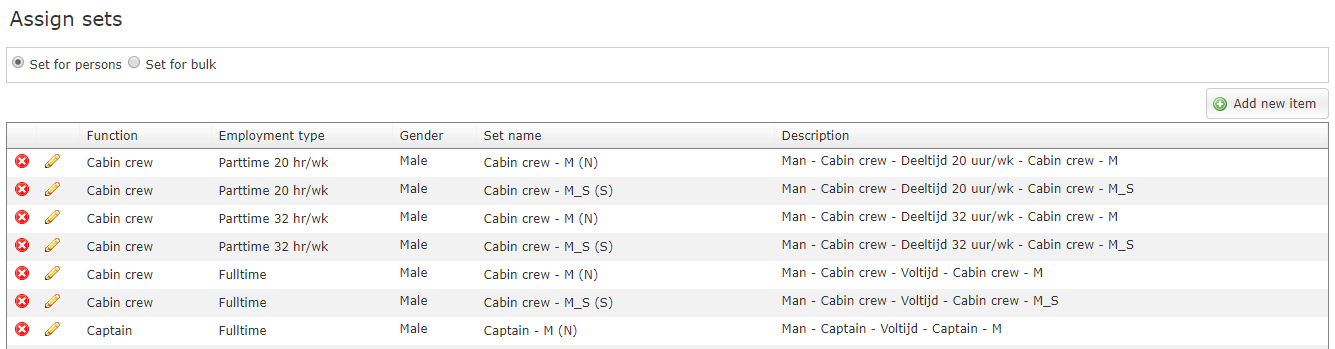
Select which type of set you would like to manage at the top of the page: Normal sets or department sets.
An existing set can be edited via the ‘pencil’.
A new set can be created by selecting the “Add new item” button:
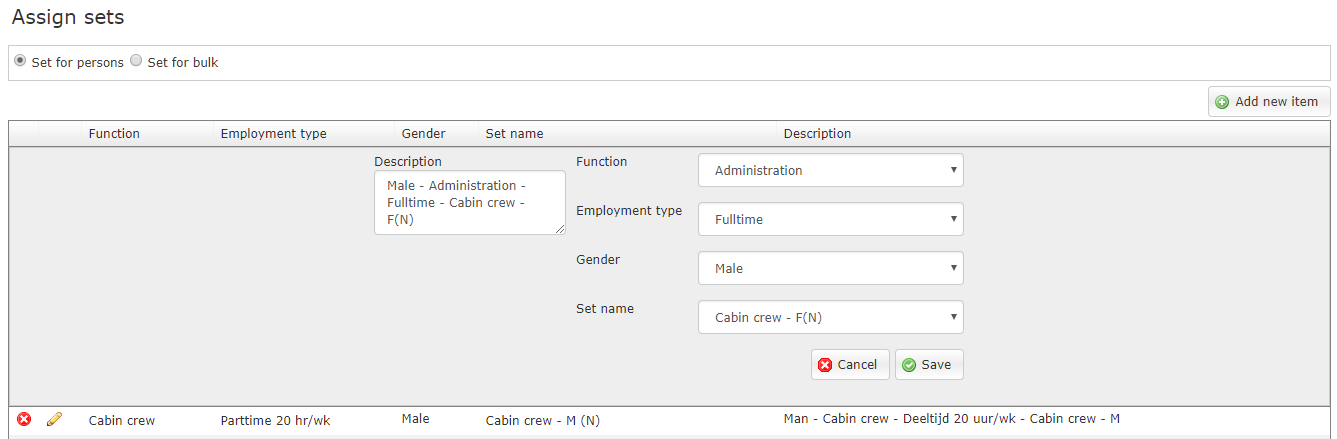
Select the Function, Employment type and Gender as well as the set to be linked. The description is generated automatically based on the selected values. This description will be visible for users to indicate which set(s) they have. It is possible to modify this description. Give the set an easy to identify name.
Confirm entry by selecting “Save”.
10. Summary
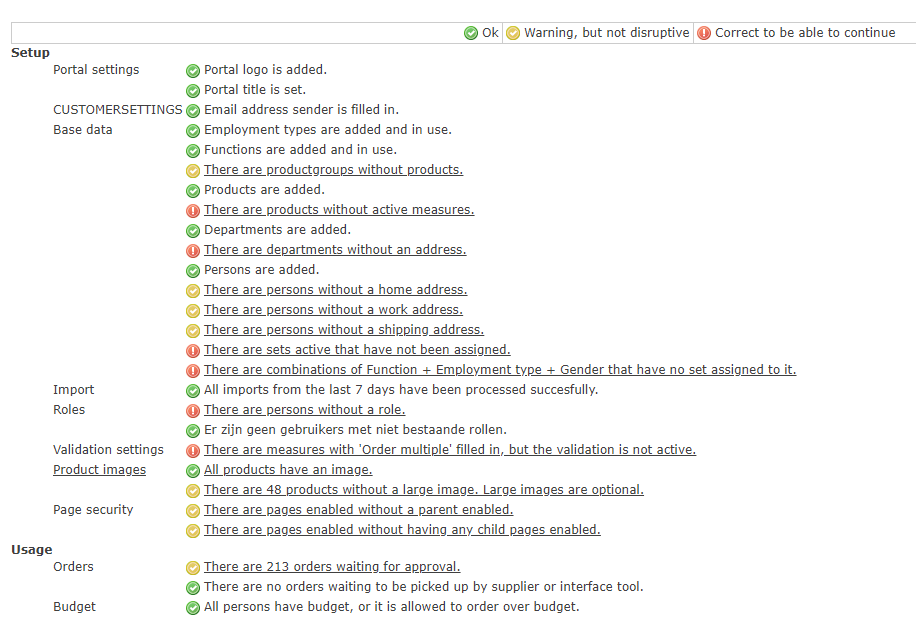
Portal Checklist
If you want Ecmanage to validate the setup of a customer portal you can select the Portal Checklist:
Optional customer portal configurations
Various topics will be addressed in the following chapter concerning further configurations.
Bespoke customer portal internet address (URL)
After creating a customer environment, this can be accessed via the following URL: https://supplier.ecmanage.co.uk/customer
“Supplier” is the name as was provided by Ecmanage. “Customer” is the company code as entered when creating the customer environment.
- Various routes are possible in defining a customer-friendly URL:
We can use the customer name as a component of the ecmanage.co.uk URL. The new address would then be https://customer.ecmanage.co.uk
It is also possible to make an extension of your own company URL. An example of this could be https://customer.yoursupplierurl.co.uk or https://www.yoursupplierurl.com/customer
As third option, the customer’s address could also be used, such as https://shop.customer.co.uk
A so-called DNS adjustment is required for the second and third options. A routing to the Ecmanage environment is then created. (IP address of the Ecmanage environment: 77.245.87.36)
Linking of supplier or customer-specific websites via URL forwarding is also possible. Linking via so-called IFRAMEs is not supported by Ecmanage due to security considerations.