 Nederlands
 English
Manage user accounts
In addition, “supplier” is the same as the name that was supplied with the purchase of Ecmanage. And “customer” is the same as the company code as entered when creating the customer environment.
You will then be taken to the login screen of the customer environment. Log in here with a user who has the authority to manage users. By default these are these the customer admin and supplier admin roles.
Search users
Go to the main menu Maintenance >> User accounts:

You can look up users using the field find. The selection field indicates which field is to be searched (last name, first name, employee number or user name).
With the “Department” selection field, the search can be limited to users in that department or one of any underlying departments. The “Filter” search field can be filled in to make the list of departments shorter.
Add new user
Click on the “Add new item” button to add a new user:
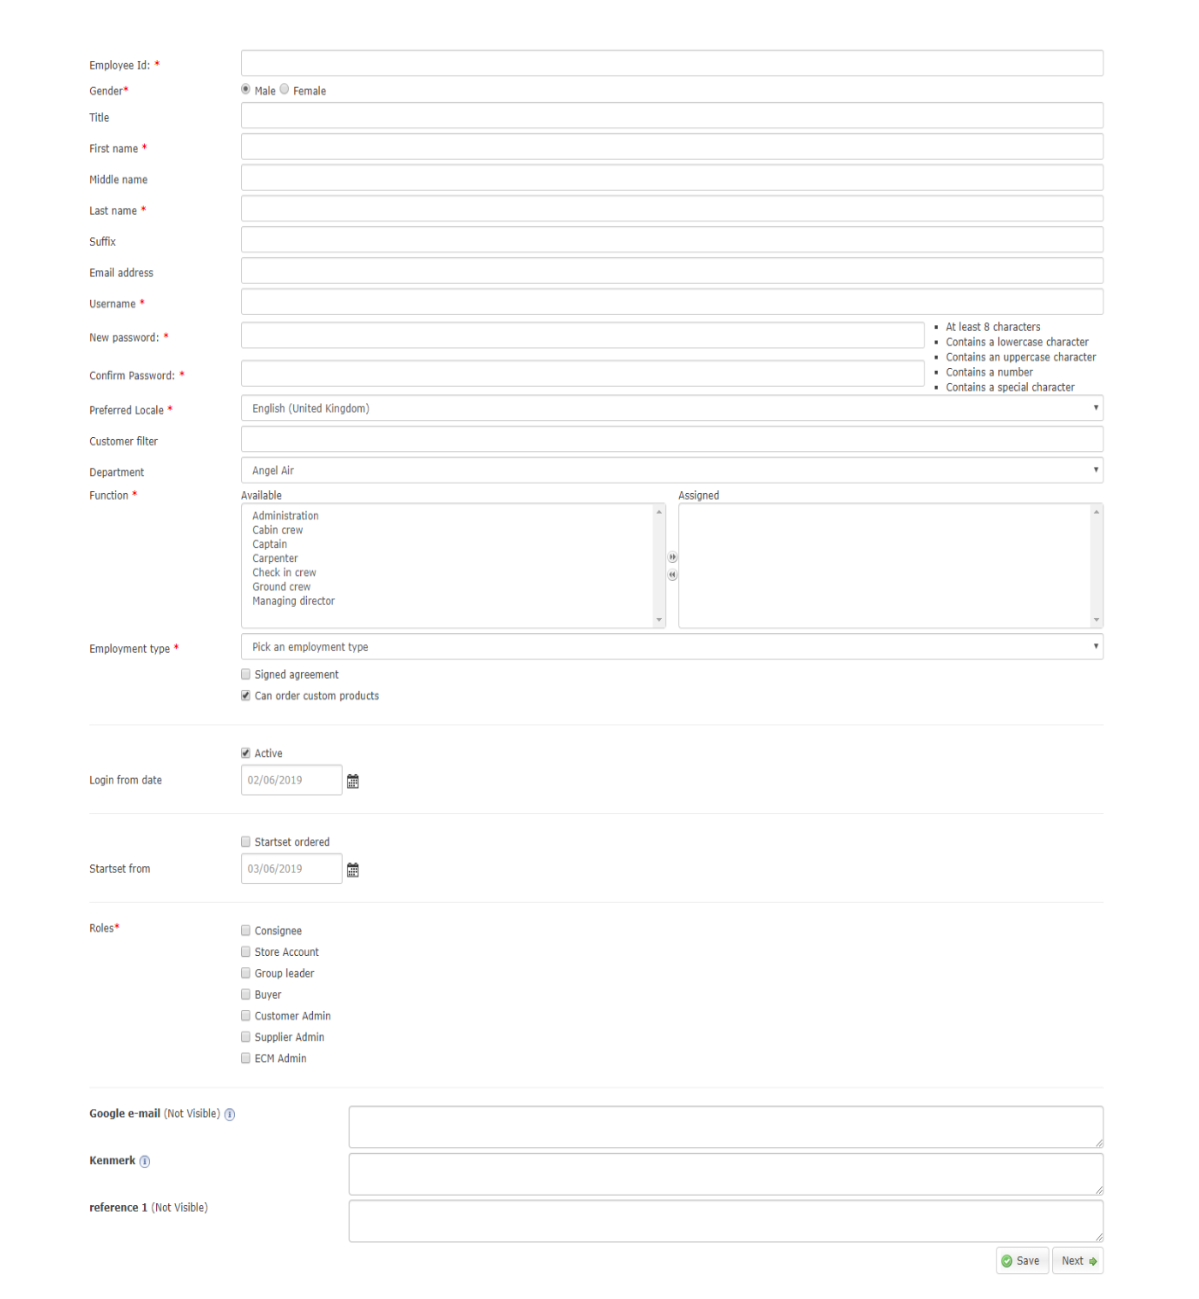
- <Employee Id>
A unique code for this user. This field is generally used for links with an ERP system.
- <Username>
This is a unique name that the user needs to log in to this environment.
- Special characters are deleted when saving the user name. For example, an “ë” becomes a regular “e”. When logging in, the same
is done with the entered username. This allows a user with a special character to log in to their username at any time.
- <Password>
When creating a password, it must meet the following criteria:
At least 8 characters
Contains a lowercase character
Contains an uppercase character
Contains a number
Contains a special character
When a (new) password is set, this default is available for 30 days. All set passwords are temporary. After the first login it must be changed immediately.
- <Department>
Indicates which department this user is in. This user can only find other users in the system who are in that department or any underlying departments.
- <Function>
Indicates which function the user has. This is used to determine which set(s) the user has. A user can also have multiple functions.
- <Employmenttype>
Indicates which employment the user has. This is used to determine which set(s) the user has.
- <Signed Agreement>
Indicates whether the user has signed the agreement. This is automatically checked as soon as a user orders it the first time.
- <Can order custom products>
It is possible to link products to specific users. These are only shown in the order list if this field is checked.
- <Active>
Indicates whether this user is active. Inactive users do not count towards the system. They cannot log in or order, and they cannot order from them.
- <Login from date>
Specifies the date from which the user may log in. The user is effectively blocked until that date.
- <Startset ordered>
Indicates whether someone has ordered a starter set. This is automatically checked as soon as a user orders a starter set.
- <Startset from>
From what date must the starter set be ordered? As soon as this date expires, and the starter set has not already been ordered, the user must order a starter set the next time.
- <Roles>
Indicates which roles the user has. With the help of page security, it is possible to determine per page which pages users can see with that role.
Then click on the button “Save” to save the user and return to the user list. Or click on the button “Next” to save the user and continue to manage this user’s addresses.
Change existing user
If the pen or the magnifying glass is clicked in the search results, the existing user belonging to it is opened.
At the top of each tab there is a list of buttons that makes it possible to switch between the tabs or return to the search results list:

Back to user list Returns to the search results list.
- Edit profile
This is the same page as when creating a new user, but all the details of the existing user has enetered and can be changed as desired.
- Manage Addresses
The addresses of the user can be managed on this page.
The only addresses shown here are the addresses that are on in the customer settings. Addresses that are set to “Read Only” at customer settings are visible, but are not changed by the user.
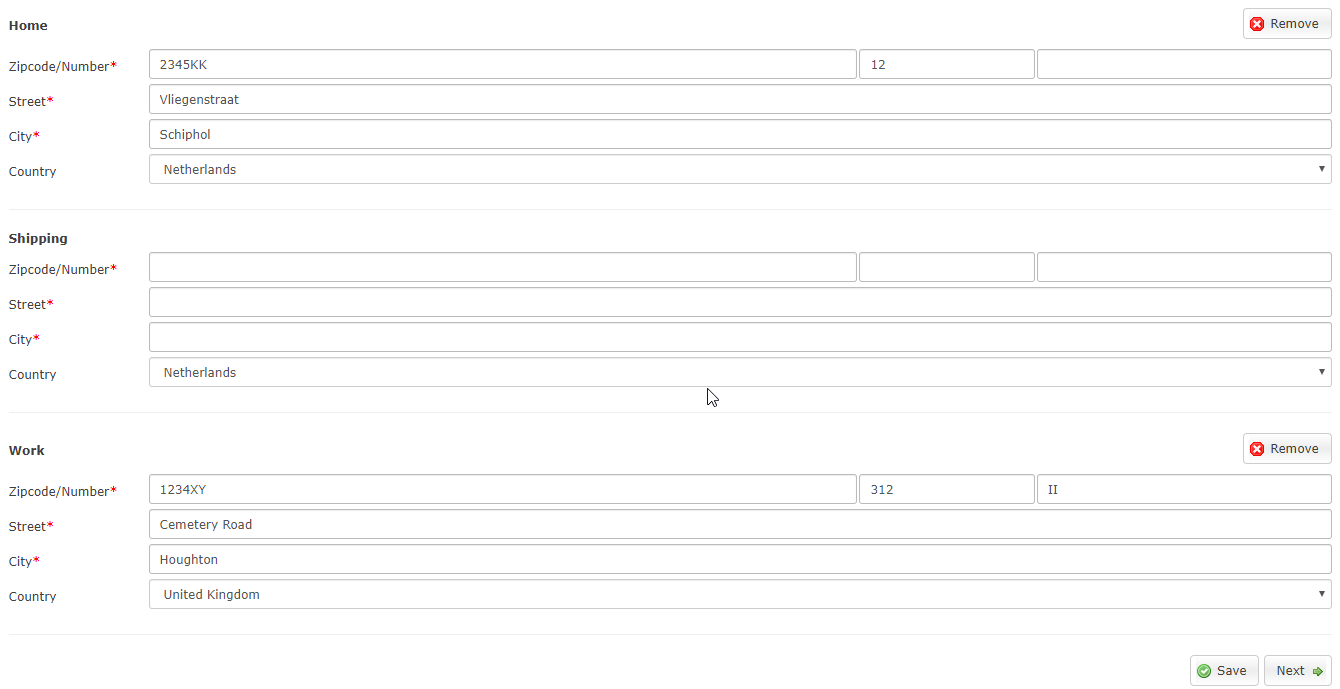
If an address is not entered, it will not be shown in the order screen. Regardless of whether it is switched on in the customer settings.
- Manage Password
The user’s password can be managed on this page.
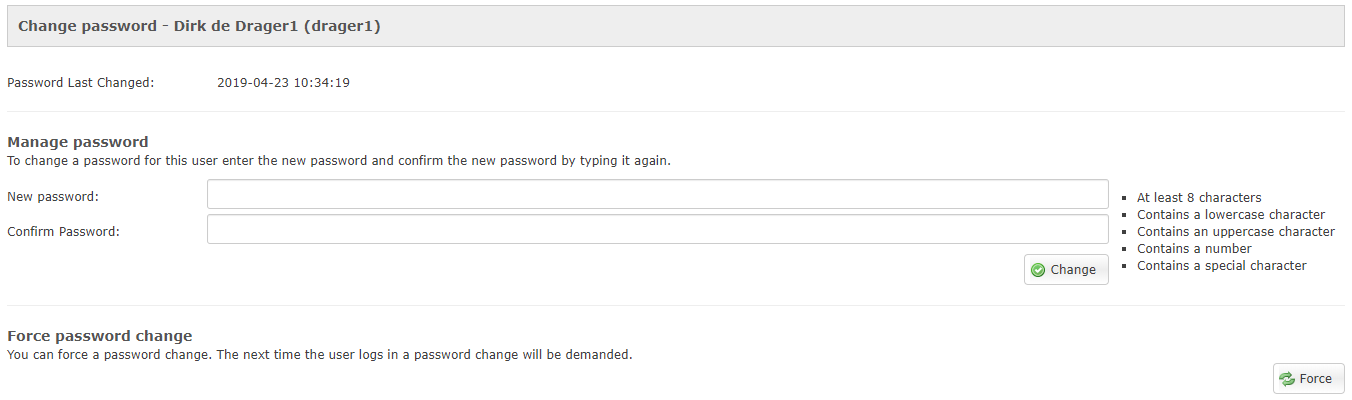
If someone has the role of “customer admin” or “supplier admin”, it is possible to force the user to change his password the next time he logs in. This is possible by clicking on “Force”.
Everyone can change their password via this page. To do this, enter the 2 password entry fields and press “Change”.
When creating a password, it must meet the following criteria:
At least 8 characters
Contains a lowercase character
Contains an uppercase character
Contains a number
Contains a special character
When a (new) password is set, this default is available for 30 days. All set passwords are temporary. After the first login it must be changed immediately.
- Manage sizes
On this page there are two options, ‘Person measures’ and ‘Measure information’. The first option, person measures, gives an overview of the personal set, here the sizes can be entered or changed:
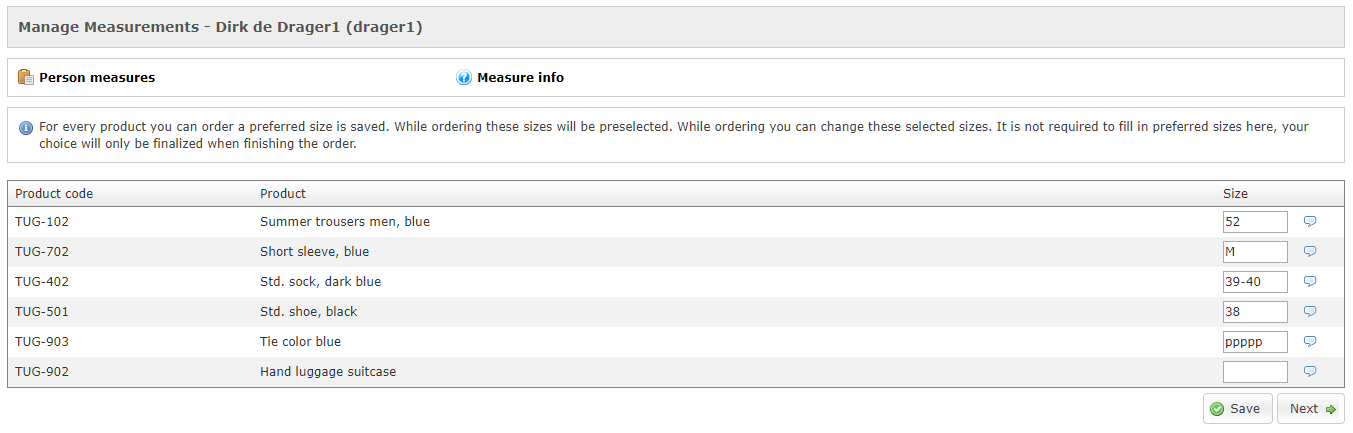
Users have their own measurements, during a measurement session these can be recorded here or imported. As soon as a user places an order, the system selects the sizes entered here.
The size is only selected if the entered size can actually be ordered, and the user has not already ordered another size recently. The system keeps track of when these measurements (and possibly measurement deviations) have been saved. The system then determines when the user last ordered each product and uses the size of the most recent of the two.
The second option, measure information, is purely informative.

During the order process, the user can click on the question mark shown in the header of each product group:

A dialog will pop up, that shows a link to any measurement instructions (a PDF document) and the measurement information as entered by the user:
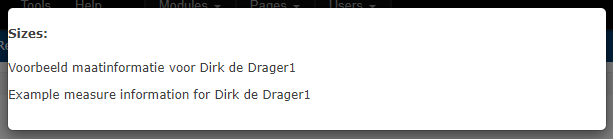
If no size information is entered, that part will not be displayed.
- Custom products:
In this screen products can be linked to the selected user. First you get an overview of which products and which sizes of these are linked to this user:
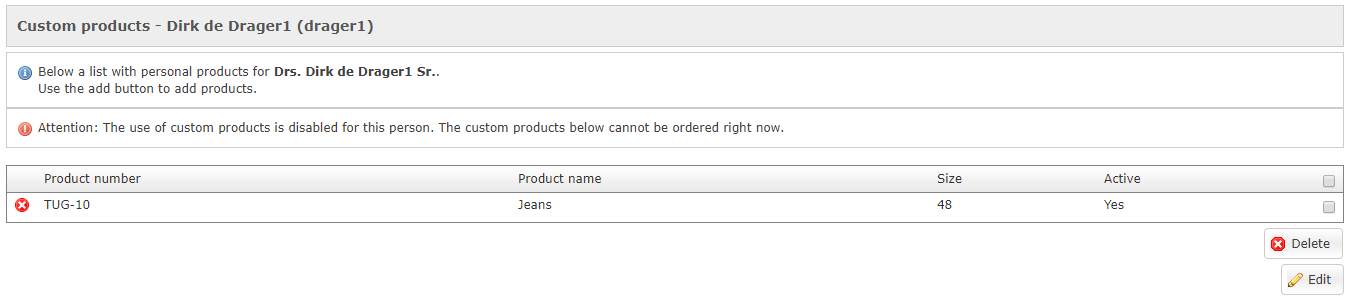
By clicking on the cross for a product you can remove it. It is also possible to check products and then click on “Delete”.
By clicking on change you can add or change linked products. For more information, see the manual Custom products.
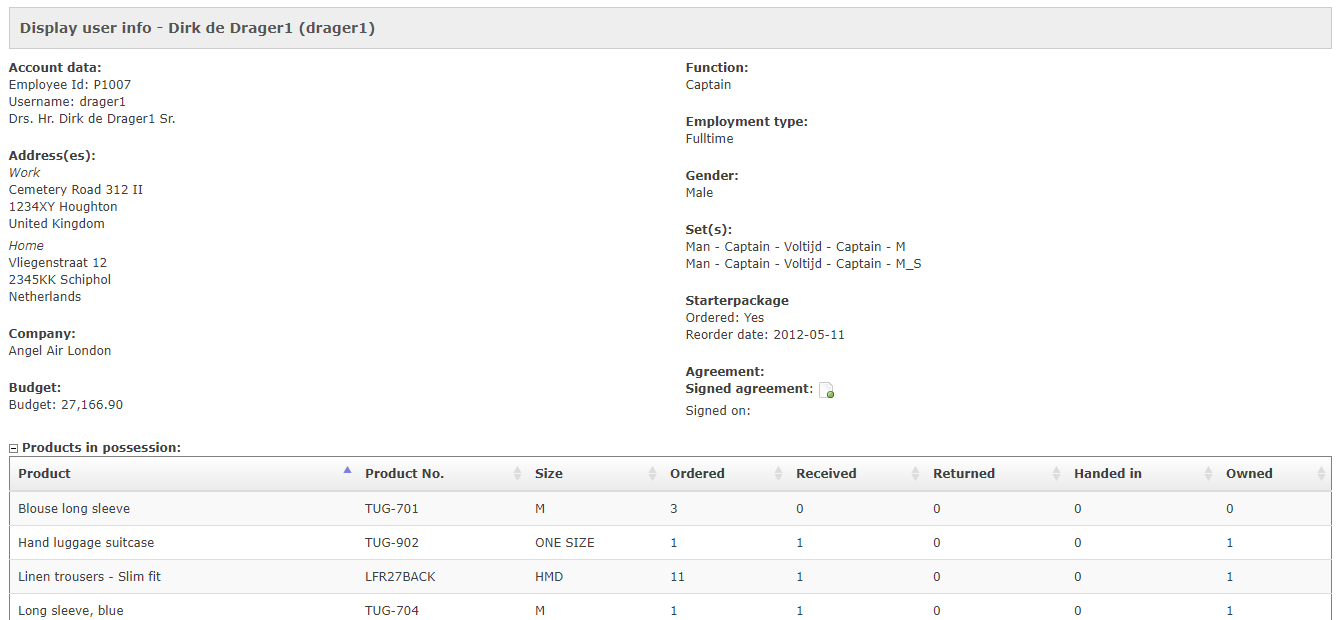
- Display user info:
This screen displays the most important information about the user. This screen is also displayed when the magnifying glass is clicked in the list.
User agreement
It is possible to let users sign an agreement.
Go to `` Maintenance >> User agreement`` to activate and change the agreement:

To activate the agreement for a department, the department must first be selected and then the “active” checkmark must be checked. An agreement can then be drawn up in the text field. It is also possible to use the formatting toolbar.
For users who have not yet signed the agreement, this agreement appears at the “Orders for me” screen. The user can only continue as soon as he has accepted the agreement.
In the list of users on the User accounts screen, the “Agreement” column indicates whether the user has signed the agreement.